Receiving Images from Geostationary Weather Satellite GK-2A

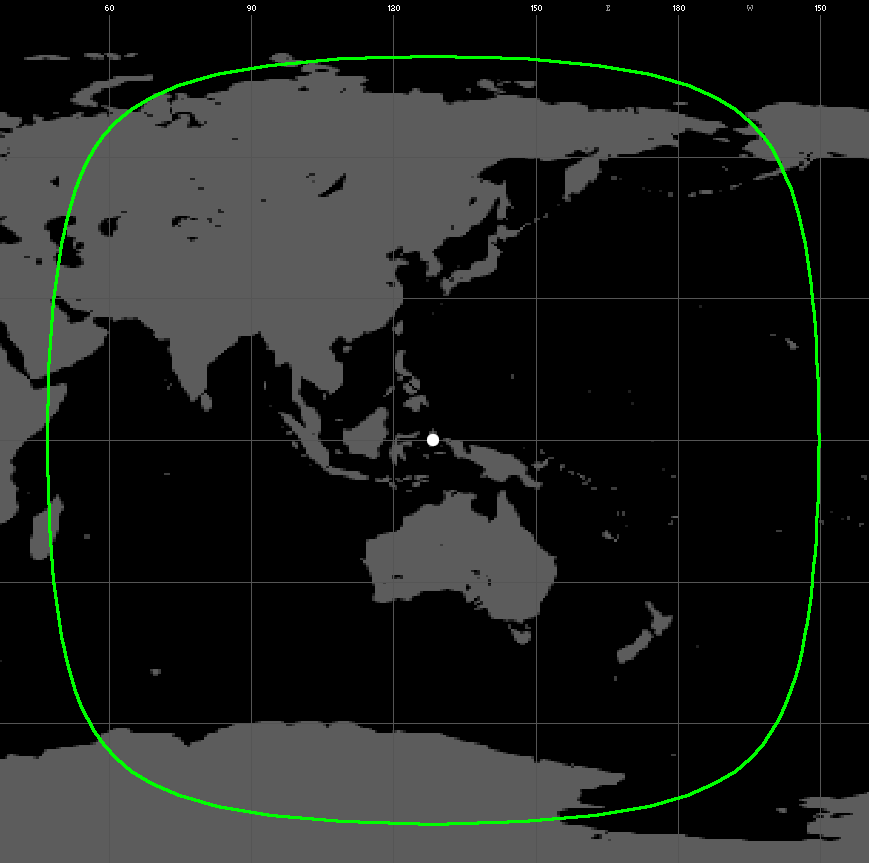
GEO-KOMPSAT-2A (GK-2A) is a geostationary weather satellite operated by the National Meteorological Satellite Center of the Korea Meteorological Administration. It is positioned over the equator at 128.2°E longitude which is visible from Australia, New Zealand, Southeast Asia, Japan, Korea, China, India and Eastern Russia.
Near real-time meteorological data from GK-2A is broadcast to users via two L-band downlinks and one X-band downlink.
| Downlink | Frequency | Data Rate |
|---|---|---|
| LRIT | 1692.14 MHz | 64 kbps |
| HRIT | 1695.4 MHz | 3 Mbps |
| UHRIT | 8070 MHz | 31 Mbps |
This guide walks through setting up the hardware and software required to receive images using the Low Rate Information Transmission (LRIT) downlink. It also covers the types of images that can be received, image post-processing and data decryption.
Image Types
Every 10 minutes the Advanced Meteorological Imager (AMI) instrument on-board GK-2A carries out a full disk observation. This process captures Earth in 16 different wavelengths of light, four of which are visible light. The remaining 12 wavelengths are various combinations of near-infrared and medium/long wave infrared.

Shortly after the observation completes, the resulting thermal infrared full disk image is transmitted via the LRIT downlink. A total of 144 full disk images are transmitted each day which is more than enough to create smooth animations such as the ones below.
Full Disk thermal infrared animation (22/07/2019)
Images not directly derived from GK-2A sensor data are also transmitted between full disk images. These include synoptic charts (surface pressure), sea temperature charts, swell forecasts and sea ice maps.
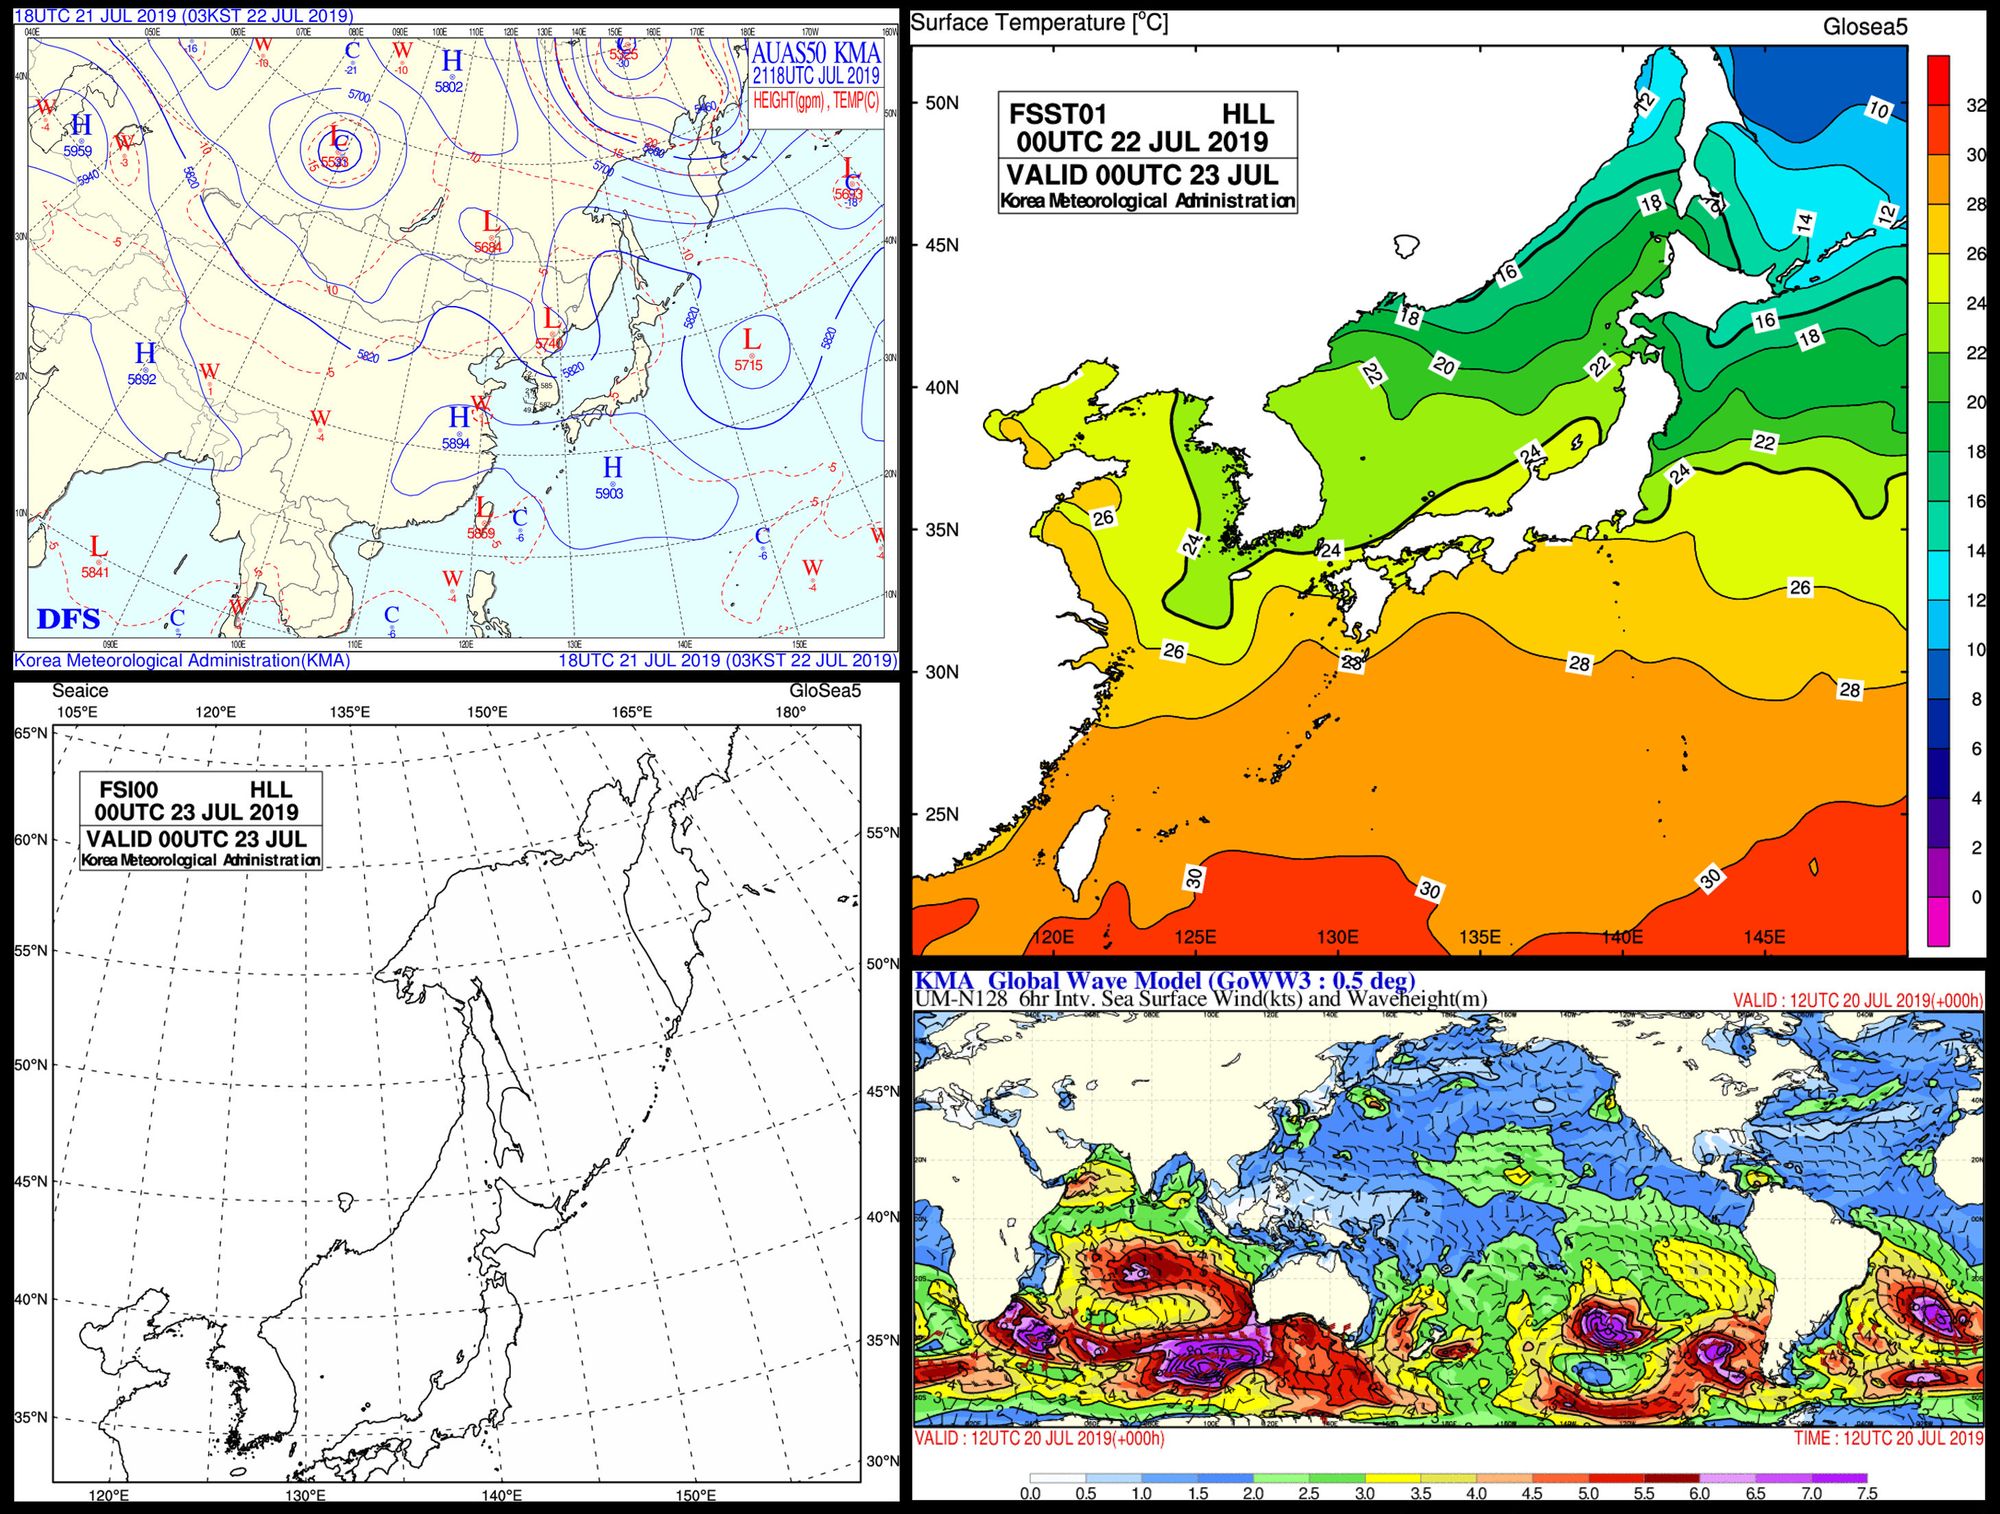
Image Post-Processing
Colour weather satellite imagery requires multiple channels (wavelengths) of data to be combined into one image which is called a false-colour image. Since only one infrared channel is transmitted via GK-2A LRIT we have to compromise by using artificial images in place of the missing wavelengths.

Matt Painter (@nullpainter) has created Sanchez, a cross-platform tool for applying colour underlays and colour lookup tables to imagery from geostationary weather satellites. Sanchez also creates reprojected maps and can blend images from multiple satellites such as GK-2A, Himawari-8 and GOES-16/17.

John Bell (@eswnl) has written some plugins for the GNU Image Manipulation Program (GIMP) to apply colour underlays to thermal infrared images. Options for image timestamps, coastline border overlays and latitude/longitude grid overlays are also available.

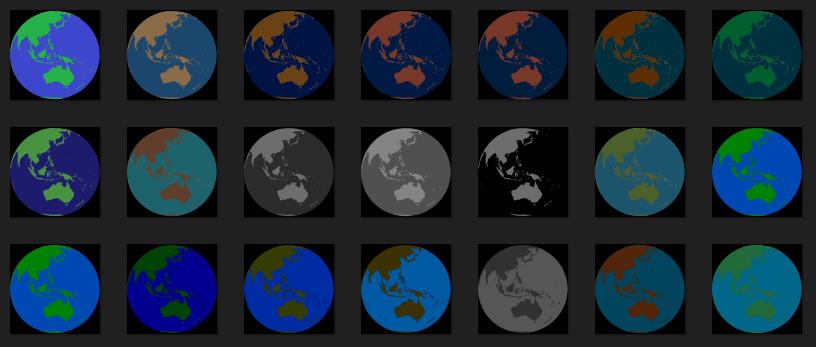
Another post-processing technique called Infrared Colour Enhancement replaces a portion of the grayscale image with a colour gradient. This reveals hidden details in the brighter and washed-out areas of an image, such as swirling cloud around the eye of a typhoon. I have written another blog post covering this topic:
 sam210723
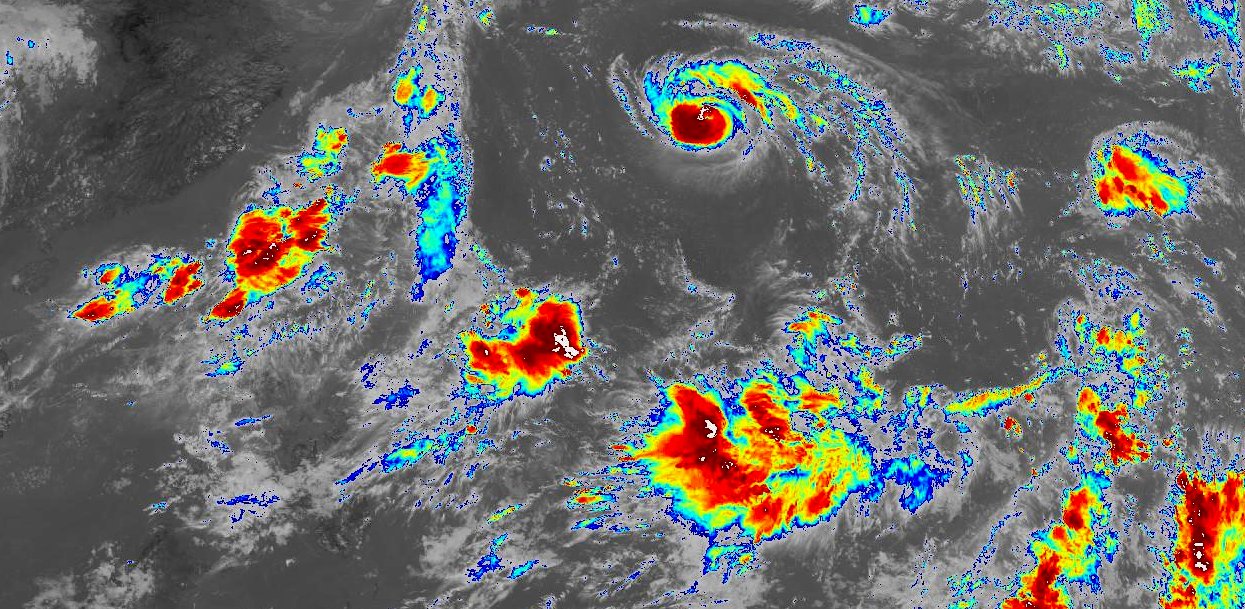

Getting Started
A basic GK-2A LRIT receiver is made up of some cheap hardware components and free open-source software. Some familiarity with Linux and RTL-SDRs is required.
Hardware
The RTL-SDR Blog has written a thorough guide for setting up the hardware required for receiving images from GOES-16/17 and GK-2A. An outline of the hardware setup is included in this guide but for full details I recommend following the RTL-SDR Blog guide linked above.
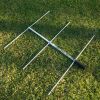
The main hardware components which make up a GK-2A receiver are a parabolic dish antenna with reasonable gain at 1.7 GHz, a low-noise amplifier and a software defined radio (SDR). The Airspy Mini, Airspy R2 and RTL-SDR (also available at NooElec) are all compatible with GK-2A receiver software. NooElec offers an excellent low-noise amplifier solution which also includes a SAW filter centered on 1688 MHz.
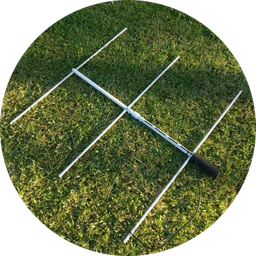
Some 2.4 GHz Wi-Fi grid dishes have sufficient gain at 1.7 GHz to be used for a GK-2A receiver. These dishes are available online for around $100 AUD from Access Antennas (AU), Wireless Professional Solutions (AU), Go Wireless (NZ) and Excel Wireless (US).

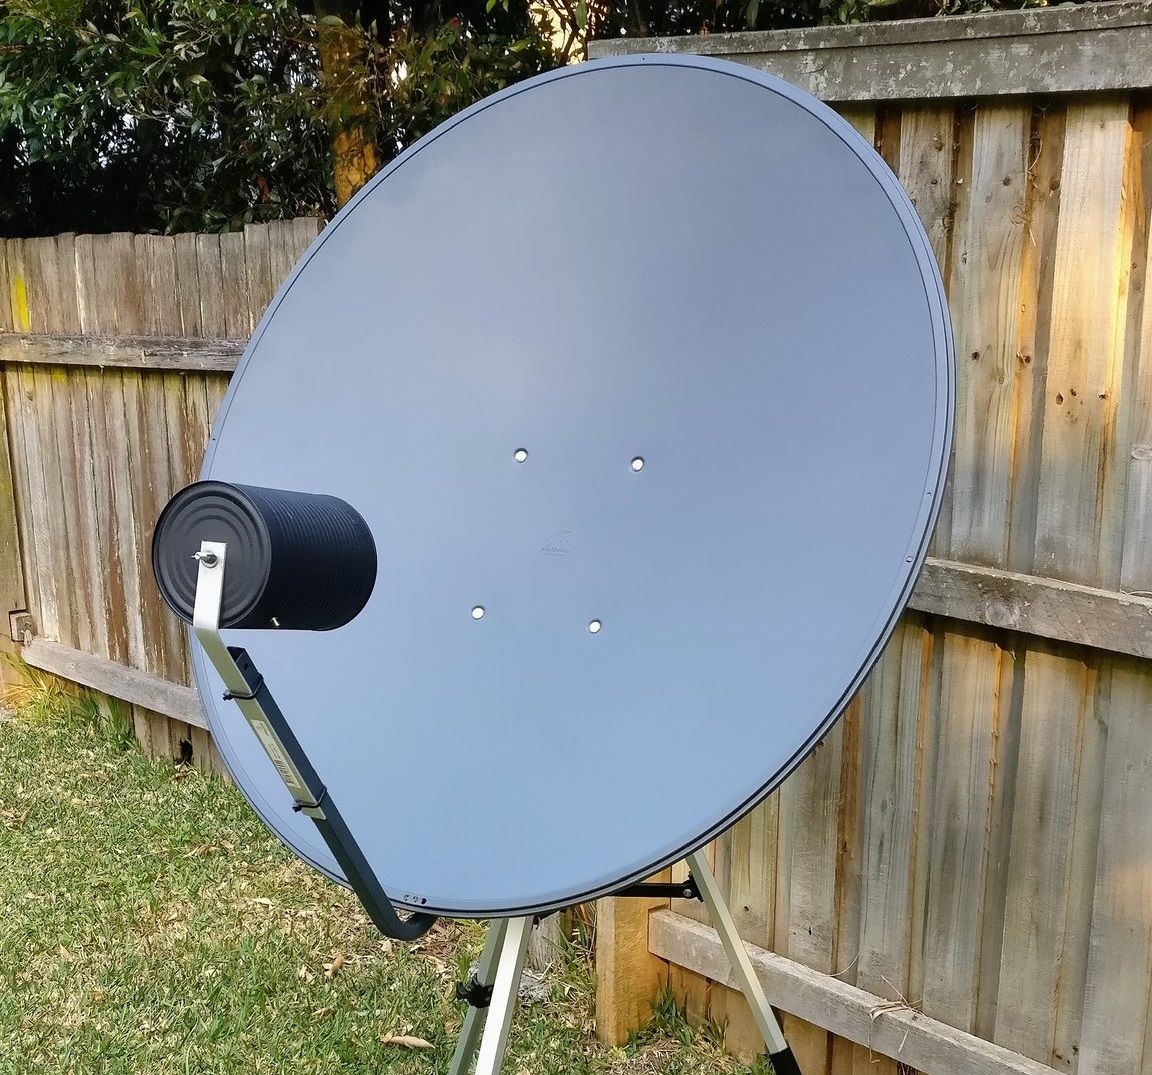
Another option is to purchase a small Ku-Band satellite TV dish and attach a DIY feedhorn such as a cantenna. This was the type of antenna used during the development and testing of xrit-rx.
Further tips on setting up hardware can be found in the RTL-SDR blog guide.
Software
A GK-2A LRIT receiver is made up of two open-source applications: goesrecv and xrit-rx. Demodulation and decoding of the LRIT downlink is handled by goesrecv, while xrit-rx takes care of demultiplexing and decrypting the packets from goesrecv into image files.
goesrecv
The first software component is goesrecv which was originally written by Pieter Noordhuis as part of the goestools software suite. This software was designed for receiving images from the American GOES weather satellites and has since been modified to support GK-2A LRIT.
Some packages are required to install goesrecv from source on Debian systems. To install these dependencies, run the following apt commands
# Update package index and install dependencies
sudo apt-get update
sudo apt-get install -y build-essential pkg-config cmake git zlib1g-dev libairspy-dev libusb-1.0-0-dev
Next, librtlsdr is built from source
# Download, compile, and install librtlsdr
git clone https://github.com/steve-m/librtlsdr.git
cd librtlsdr
mkdir build
cd build
cmake -DCMAKE_INSTALL_PREFIX:PATH=/usr -DINSTALL_UDEV_RULES=ON ..
sudo make -j2 install

# Load udev rules and blacklist the DVB driver shipped with the OS
sudo cp ../rtl-sdr.rules /etc/udev/rules.d/
sudo ldconfig
echo 'blacklist dvb_usb_rtl28xxu' | sudo tee --append /etc/modprobe.d/blacklist-dvb_usb_rtl28xxu.conf

sudo reboot
Finally, goesrecv can be built from source
# Download, compile, and install goesrecv
git clone --recursive https://github.com/sam210723/goestools
cd goestools
mkdir build
cd build
cmake .. -DCMAKE_INSTALL_PREFIX=/usr/local
make
sudo make install
cd ../..

# Copy configuration file and test run goesrecv
cp goestools/etc/goesrecv.conf goesrecv.conf
goesrecv --version
After this process, the terminal should show something similar to the following:
goesrecv for GK-2A

Originally part of goestools written by Pieter Noordhuis
and contributors (https://github.com/pietern/goestools)

Modified by sam210723 for compatibility with GEO-KOMPSAT-2A
(https://github.com/sam210723/goestools)
Finally, the configuration file for goesrecv is edited based on the SDR being used. By default, goesrecv is configured for use with an Airspy Mini or R2.
If an RTL-SDR is being used, the source setting must be changed to rtlsdr and the corresponding source settings ([rtlsdr] and frequency) must be un-commented (remove #).
If a bias-tee powered low-noise amplifier is being used in this system (such as the NooElec SAWbird), the bias_tee setting should be changed to true, otherwise this should be left as false to not damage the SDR or other RF devices.
Configuration for Airspy SDRs:
[demodulator]
satellite = "GK-2A"
downlink = "lrit"
source = "airspy"

[airspy]
frequency = 1692140000
## 2500000 for the R2, 3000000 for the Mini
# sample_rate = 3000000
# gain = 18
# bias_tee = false

# [rtlsdr]
# frequency = 1692140000
# sample_rate = 1024000
# gain = 30
# bias_tee = false
# device_index = 0
Configuration for RTL-SDRs:
[demodulator]
satellite = "GK-2A"
downlink = "lrit"
source = "rtlsdr"

# [airspy]
# frequency = 1692140000
## 2500000 for the R2, 3000000 for the Mini
# sample_rate = 3000000
# gain = 18
# bias_tee = false

[rtlsdr]
frequency = 1692140000
# sample_rate = 1024000
# gain = 30
# bias_tee = false
# device_index = 0
xrit-rx
The second software component, xrit-rx, was written specifically to support imagery from GK-2A and COMS-1 (predecessor to GK-2A). It is written in Python 3 so does not need to be compiled, however some packages need to be installed before use.
xrit-rx requires Python 3.6 or newer to run correctly. To check which version of Python 3 is installed on your system run python3 --version. Instructions for installing or upgrading Python 3 on Windows or Linux can be found in this tutorial.
The Python package manager pip also needs to be installed. On Windows, the Python installer will include pip by default. For Ubuntu or Raspbian, pip can be installed by running the following commands:
sudo apt-get update
sudo apt-get install python3-pip
Next, xrit-rx.zip is downloaded from the Releases page of the GitHub repo then unzipped into a new folder.
# Download and unzip latest xrit-rx release from GitHub
wget https://github.com/sam210723/xrit-rx/releases/latest/download/xrit-rx.zip
mkdir xrit-rx
unzip xrit-rx.zip -d xrit-rx
cd xrit-rx
Python packages numpy, pillow, pycryptodome and colorama are now installed using pip.
# Install dependencies using pip
pip3 install -r requirements.txt
Some extra packages are required by numpy and pillow on Ubuntu or Raspbian systems. Install these packages by running:
sudo apt-get install libatlas-base-dev libopenjp2-7-dev libtiff-dev
Next, the GK-2A decryption key list needs to be downloaded so xrit-rx can decrypt received data into normal image files. Users normally have to apply for decryption keys through the Korea Meteorological Administration website. Applications from government departments, research institutes, and large organisations seem to be prefered rather than from individual users.
During the development of software for COMS-1 (predecessor to GK-2A), valid decryption keys were found in code samples provided publicly on the Korea Meteorological Administration website. These keys have continued to work with all GK-2A data to date and are still publicly available on the KMA NMSC website.
To obtain these keys:
- Open the COMS Operation page
- Click the "HRIT/LRIT Data Decryption samples C code" link to download
COMS_Decryption_Sample_Cpp.zip - Extract the key file called
EncryptionKeyMessage_001F2904C905.bin - ZIP file can now be deleted
- Copy the key file to your xrit-rx folder

This Encryption Key Message file itself is encrypted and needs to be decrypted before use. The second part of the file name is the decryption key for this file: EncryptionKeyMessage_001F2904C905.bin. The keymsg-decrypt.py script in the xrit-rx "tools" folder can decrypt this file and will output the plain-text keys to a new file called EncryptionKeyMessage.bin.
python3 tools/keymsg-decrypt.py EncryptionKeyMessage_001F2904C905.bin 001F2904C905
Once the script has output the decrypted keys to EncryptionKeyMessage.bin, the original encrypted key file can be deleted. For those interested, I have covered the key decryption process in-depth in a previous post:
sam210723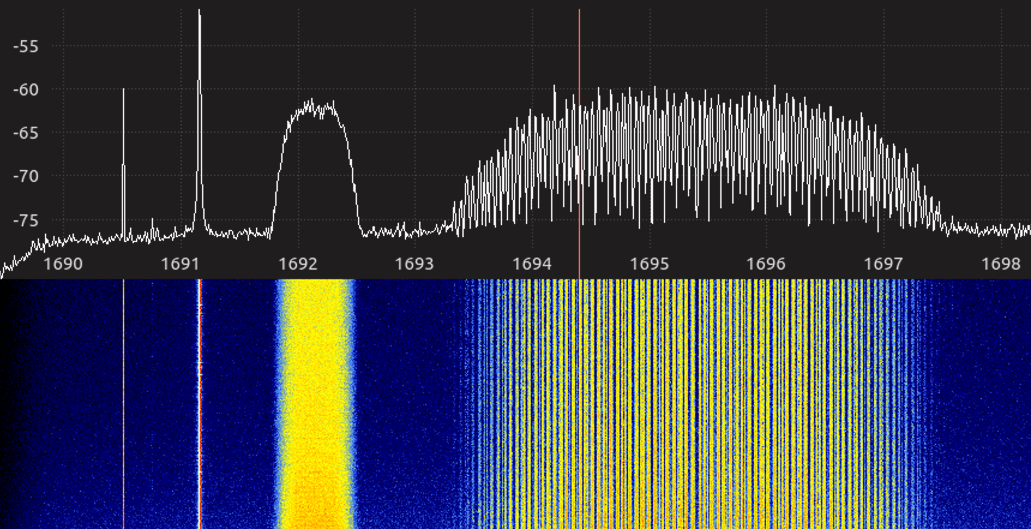
Finally, xrit-rx can be configured using the options in the xrit-rx.ini file. A full list of options can be found in the readme on GitHub.
Typically, goesrecv and xrit-rx will be running on the same device but this is not required. The packets output by goesrecv can be received by xrit-rx over a local network connection. If this is the case, the ip option in xrit-rx.ini will need to be updated with the IP address of the device running goesrecv. If goesrecv and xrit-rx are running on the same device, this option should be left as the default value of 127.0.0.1.
By default, a folder called received will be created inside the xrit-rx folder to store images received from GK-2A. This folder location can be changed using the path option in xrit-rx.ini, however this is typically not necessary.
[output]
path = received
images = true
xrit = false
# List of VCIDs to ignore (e.g. '4,5')
#   - VCID 0: Full Disk
#   - VCID 4: Alpha-numeric Text
#   - VCID 5: Additional (non-sensor) data
channel_blacklist =

[goesrecv]
ip = 127.0.0.1
vchan = 5004
Receiving Images
With all the hardware and software components ready we can finally begin receiving images from GK-2A.
Running goesrecv
Run goesrecv by opening a new terminal window in a folder which contains the goesrecv.conf configuration file and run the following command:
goesrecv -v -i 1 -c goesrecv.conf
Once running, goesrecv will print information to the console similar to the following:
2020-02-10T10:12:57Z [monitor] gain: 61.04, freq:  1200.1, omega: 8.000, vit(avg):   98, rs(sum):    0, packets:  8, drops:  0
2020-02-10T10:12:58Z [monitor] gain: 61.04, freq:  1187.5, omega: 8.000, vit(avg):  104, rs(sum):    0, packets:  8, drops:  0
2020-02-10T10:12:59Z [monitor] gain: 61.04, freq:  1195.7, omega: 8.000, vit(avg):  108, rs(sum):    0, packets:  7, drops:  0
2020-02-10T10:13:00Z [monitor] gain: 61.04, freq:  1180.5, omega: 8.000, vit(avg):   99, rs(sum):    0, packets:  8, drops:  0
If the packets counter shows 7 or 8 and and drops shows zero, goesrecv has locked on to the LRIT downlink from GK-2A. If not, the LRIT signal may be too weak and adjustment of the antenna using goesrecv monitor is required.
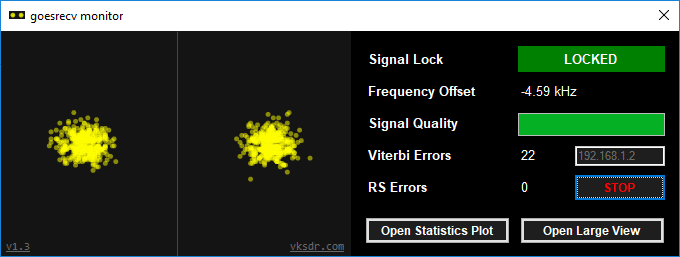
goesrecv monitor
An optional but recommended step is to use goesrecv monitor to fine tune the azimuth and elevation of the receiving antenna to get the best signal possible from GK-2A. The signal quality meter and constellation plot give a real-time indication of the signal strength, making it quick and easy to fine tune antenna alignment.
Microsoft .NET Framework Runtime v4.8 (direct download) is required to run goesrecv monitor. Once .NET is installed, download the latest release of goesrecv monitor and extract all files inside the ZIP to a new folder.
Finally, run goesrecv-monitor.exe and enter the IP address of a device running goesrecv, then click Connect (or hit enter). The constellation plot and statistics list will start showing data.
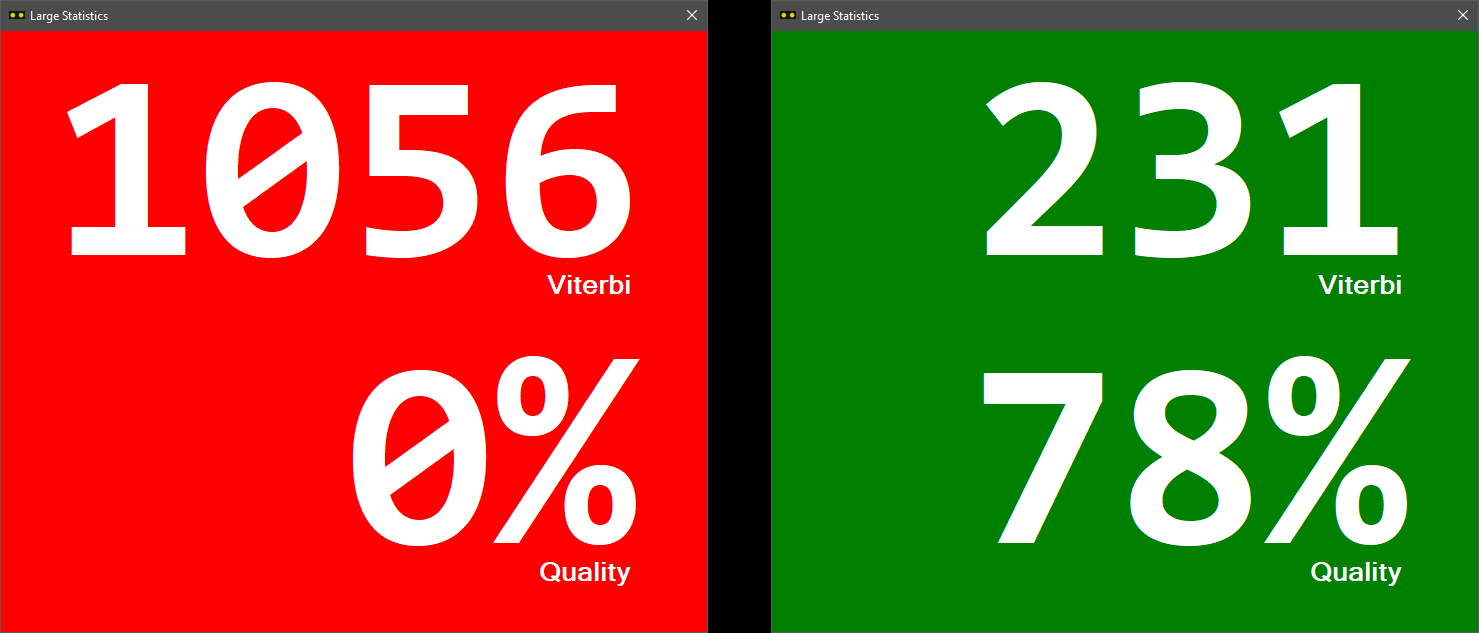
The large statistics window is intended to improve visibility of the Viterbi error count and Signal Quality percentage from a distance. This is useful while while fine tuning the alignment of an antenna. The window background colour changes between red and green to indicate the Signal Lock state.
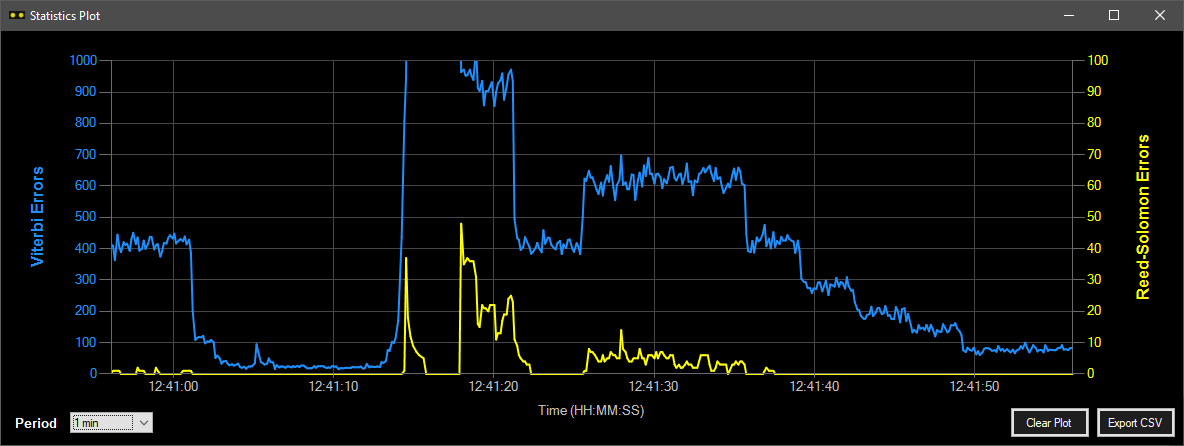
goesrecv monitor can plot the Viterbi and Reed-Solomon error counts in real-time using the Statistics Plot window. The plot has selectable time ranges from 1 minute up to 24 hours. Plot data can be exported to a CSV file using the "Export CSV" button on the lower right of the window.
Running xrit-rx
Run xrit-rx by opening a new terminal window in the xrit-rx folder which was created earlier and run the following command:
python3 xrit-rx.py
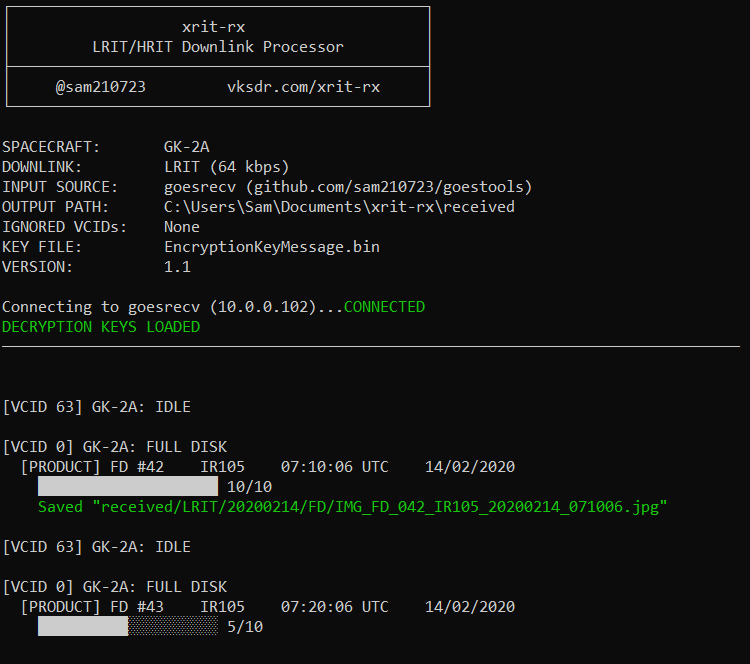
Ensure a message saying DECRYPTION KEYS LOADED appears in the startup information printed by xrit-rx. If not, return to the decryption key configuration steps above and confirm the processed key file is present in the xrit-rx folder.
xrit-rx will connect to goesrecv at the IP address specified in the configuration file and begin receiving packets. Within a few minutes an image will be received from GK-2A and saved to the received folder inside the xrit-rx folder.
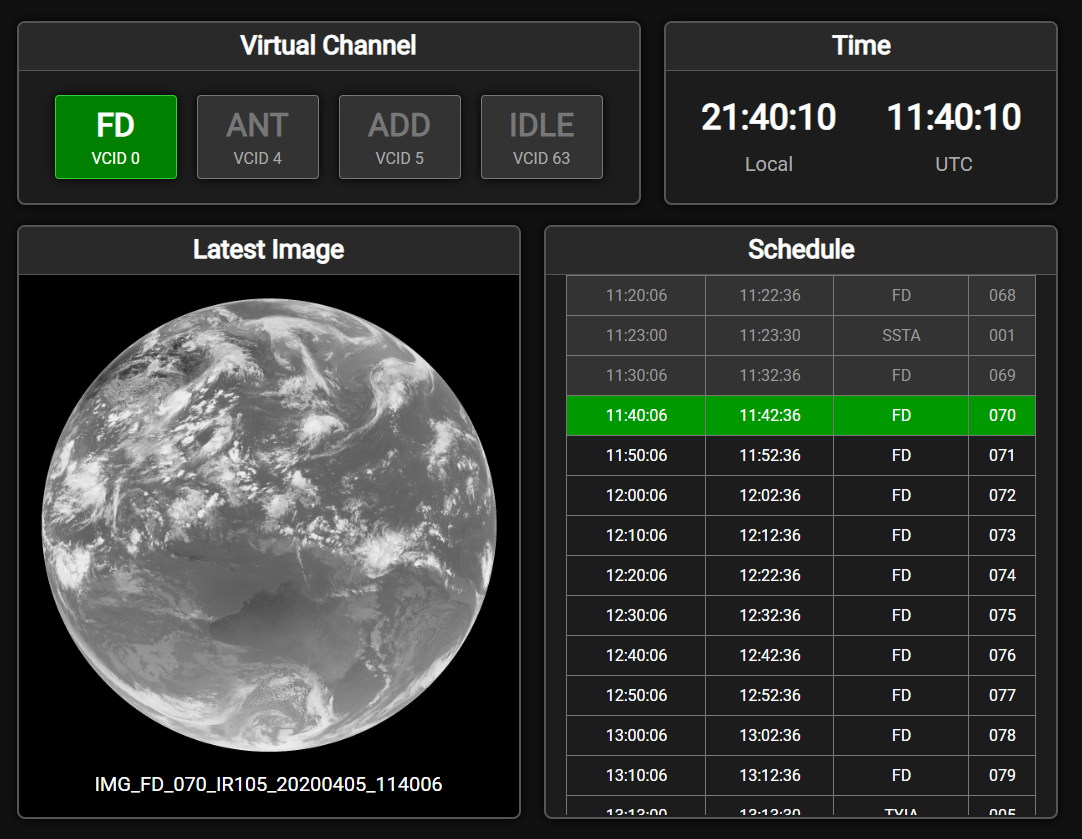
Initially xrit-rx may appear to be doing nothing, but if the console output includes "[VCID 63] GK-2A: IDLE" then the LRIT downlink is successfully being received and xrit-rx is waiting for an image transmission to start. For precise image transmission times see the LRIT Schedule on the xrit-rx dashboard (see below).
Dashboard for xrit-rx
Included in xrit-rx is a web-based monitoring dashboard for convenient monitoring of the decoder and viewing of received data. It also displays the LRIT transmission schedule which is downloaded from the KMA website when the dashboard is loaded.
By default the dashboard is accessible via HTTP on port 1692 and will update with new data every second. These settings can be changed in the xrit-rx.ini configuration file (list of options).
Setting up Linux services
Optionally, goesrecv and xrit-rx can be configured as Linux systemd services which start automatically when the system boots up.
For goesrecv, download goesrecv.service and edit the -c option to match the location of goesrecv.conf on your system.
[Unit]
Description=goesrecv reception chain for GEO-KOMPSAT-2A
Documentation=https://github.com/sam210723/goestools
Wants=network.target
After=network.target

[Service]
ExecStart=/usr/local/bin/goesrecv -i 10 -c /home/pi/goesrecv.conf
StandardOutput=null
Type=simple
Restart=on-failure
RestartSec=30
Nice=-5

[Install]
WantedBy=default.target
For xrit-rx, download xrit-rx.service and edit the WorkingDirectory option to match the location of the xrit-rx folder on your system.
[Unit]
Description=xrit-rx - LRIT/HRIT Downlink Processor
Documentation=https://github.com/sam210723/xrit-rx
Wants=network.target
After=network.target

[Service]
WorkingDirectory=/home/pi/xrit-rx
ExecStart=/usr/bin/python3 xrit-rx.py
StandardOutput=journal
Type=simple
Restart=on-failure
RestartSec=30
Nice=-5

[Install]
WantedBy=default.target
Next, copy goesrecv.service and xrit-rx.service to /etc/systemd/system by running the following command:
sudo cp *.service /etc/systemd/system && sudo systemctl daemon-reload
With the services now installed, run the following commands to start goesrecv and xrit-rx as services:
sudo systemctl start goesrecv.service
sudo systemctl start xrit-rx.service
The status of these services can be checked with the following commands:
systemctl status goesrecv.service
systemctl status xrit-rx.service
To check the xrit-rx has started properly, run the following command to view the console output of xrit-rx and look for any error messages:
sudo journalctl -u xrit-rx.service
Finally, run the following commands to have goesrecv and xrit-rx start automatically when the system boots.
sudo systemctl enable goesrecv.service
sudo systemctl enable xrit-rx.service
To stay updated on future developments of xrit-rx follow me on Twitter. Feel free to open a new issue in the xrit-rx, goesrecv, or goesrecv monitor repos on GitHub if you come across bugs or have a feature request!